Online Source of Printer Tips,Tricks,Troubleshooting,and Technical Support.

December 31, 2009

Canon Printing Technology: ChromaLife 100+

ChromaLife 100+ is a new system of Canon printing technology to preserve long-lasting beauty of photos.
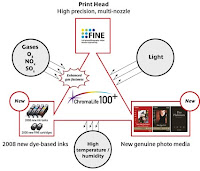
In order to maximize the superior printing ability of the "FINE' print head, Canon continues to develop ink and paper specifically for PIXMA printer to enhance their performance.
In 2008,a further advance has been achieved with the introduction of new genuine dye ink and genuine photo paper.
The new system;ChromaLife 100+ provides longer-lasting and more beautiful vivid photo prints.
ChromaLife 100+ provides: 
  • Over 300-years life in an album
  • Approx. 30-years light fastness
  • Approx. 20-years gas fastness
As the comparison, the previous technology ChromaLife 100 provides:
  • Approx. 100-years lif in an album
  • Approx. 30-years light fastness
  • Approx. 10-years gas fastness
Share:

December 30, 2009

Change Paper Source Setting Canon Pixma MP638

Related models:
Canon Pixma MP628,MP638,MP648,etc
As we know that Canon Pixma MP638 has two paper source: Cassette and Rear Tray. Default setting of paper source of Canon Pixma MP638 define as: Casette for plain paper and Rear Tray for photo paper. But,sometimes we need to print on plain paper from specified paper source. Before doing this,we need to select paper source first. We can change paper source setting both from printer driver properties or from the printer menu. For this chance, I tell you how to set plain paper source directly from the printer menu.


Here are the steps:
  • Scroll Easy Scroll Wheel until Setting menu appears,press OK button
  • Select Device Setting,press OK
  • Select Plain Paper Feed Setting,press OK
  • Specify paper source: Rear Tray or Cassette
Share:

Canon Pixma iP1200 Self Test: Checking Nozzle Pattern Without Computer

Applicable models:
Canon Pixma iP series: iP1200,iP1600,iP2200,iP1300,iP1700,iP1880,iP2580,iP1980
How can we check whether the printer work normally or not while we have no computer to connect?.  Well,actually we can perform self test on Canon pixma iP series listed above  without being connected to the computer. Just do following procedure.

PROCEDURE:
  • Power ON the printer and make sure that the cartridge are installed
  • Set the paper in paper tray
  • In stand by condition, press RESUME button 5 times in a row within 2 seconds (The printer will start printing immediately).
The print out pattern should be like this:


Share:

December 26, 2009

The Most Extreme Sex Position of The World

Once in a while I write non printer related post that you can find under miscellaneous category even though my blog focused on printer topic. I just need refreshing like you all do :). Well,please check this one.
Probably,this is the most extreme and dangerous sex position in the world ever. If you are not professional,please don't do this action!
Share:

December 25, 2009

Reset Waste Ink Counter Epson Stylus T10

Applicable Models: 
Epson Stylus T10,T11

PROCEDURE

Preparation:

Steps:

  • Turn on the printer and connect the cable
  • Click Loader.exe to run program
  • On License Agreement window, click Accept button
  • Click Select button
  • Select the printer model
  • Select auto detection on Port menu
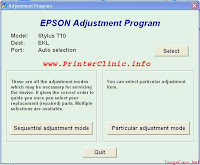
  • Click Particular Adjustment Mode
  • Select Maintenance>Waste Ink Pad Counter

The following window appears


  • Click Check button to show the counter value
  • Click Initialization button and wait until the operation is completed
  • Turn of the printer when you order to do so
  • Click OK button
  • Wait until an order to turn on the printer shows
  • Turn on the printer
  • Click OK button
  • Last, click Check button to ensure that the operation is successful
  • Exit adjustment program and operate your printer as usual
Share:

EEPROM Resetter for Epson T10

Related Models:
Epson Stylus T10,T11
This is an adjustment program software (EEPROM resetter) for Epson Stylus T10 and T11 inkjet printer series. The T10 EEPROM resetter is used to reset waste ink pad counter for Epson Stylus T10 and T11 colour printer.
Please read reset procedure before using this software.

Share:

December 24, 2009

Access Maintenance Menu of Canon Pixma MP638

Canon Pixma MP638 is one of the latest canon multifunction printer which has Easy Scroll Wheel button. This button allow us move from one menu to another.

In this chance I will lead you how to access maintenance menu of this printer without PC.

Steps:
  1. Scroll the Easy Scroll Wheel until SETTING menu appears, press OK button
  2. When MAINTENANCE menu appears, press OK button
  3. Select the maintenance operation to perform:
  • Nozzle Check Pattern: Print current pattern of the print head to check nozzle condition.
  • Cleaning: Clean the print head nozzle to prevent it from clogging or to unclog the print head.
  • Deep Cleaning: Perform cleaning operation with the longer duration.
  • Auto Head Alignment: Align the print head automatically.
  • Manual Head Alignment: Align the print head manually.
  • Head Alignment Print: Print current value (pattern) of the print head alignment.
  • Roller Cleaning: Execute paper feed roller cleaning operation.
  • Bottom Plate Cleaning: Execute bottom plate cleaning operation.
Source:
Parts Catalog
Share:

December 21, 2009

Reset Waste Ink Counter Canon i320

Applicable models:
Canon i320,Pixus xnu i320
PROCEDURE
Step I: Enter Service Mode
  • Hold down POWER button
  • Plug in power cable
  • Press RESUME button twice in a row
Step II: Operating EEPROM Resetter (General Tool)


  •  Run General Tool.exe
  • Connect USB cable
  • Select USB PORT
  • Under SET DESTINATION menu,click on: 1 for Pixus xnu i320,2 for i320
  • Exit General Tool and turn off the printer
The EEPROM data is cleared by setting the destination of the printer and get your printer work!.

Source: Service Manual
Share:

Reset Waste Ink Counter Canon i255

Applicable Models:
Canon i series: i255,i250,i350,i355
This service action is needed to clear waste ink absorber full error of Canon i250,i255,i350,i355.


PROCEDURE

Step I: Enter Service Mode:

  • Hold down POWER button
  • Plug in power cable
  • Press RESUME button twice in a row
Step II: Operating EEPROM Resetter (General Tool)


  • Connect USB cable
  • Run General Tool.exe
  • Select USB PORT
  • Check EEPROM CLEAR check box
  • Set A4 paper on sheet feeder
  • Click TEST PATTERN 1 or TEST PATTERN2 
(Wait until the printer complete printing test pattern,EEPROM data is cleared while printing the test pattern)
  • Exit general tool and turn off the printer

    Now turn on the printer and you will get your printer work normally.

    Source: Service Manual
    Share:

    Enter Service Mode Canon Pixma MX308

    Applicable Models:
    Canon Pixma MX series: MX318,MX850,MX7600,etc
    In order to enter service mode of Canon Pixma MX308, please read carefully the following procedure.

    PROCEDURE

    • Plug in power cable
    • In OFF condition, press and hold STOP/RESET button
    • Press and hold POWER button
    • Release STOP/RESET button
    • Press STOP/RESET button twice in a row
    • Release POWER button
    In this state,the printer has been already in Service Mode and you can access some service actions from here.

    Source: Service Manual
    Share:

    December 18, 2009

    Reactivate Ink Level Detection Function

    Applicable Models:
    BJC series: bjc3000,8200,etc
    S series: s400,s600,s800,s6300,s9000,etc
    i Series: i255,i320,i350,i355,i450,i550,i560,i850,i950,i6100,
    i6500,i9100,etc
    Pixma series: ip1000,ip1200,ip1300,ip1500,ip1600,ip1700,ip2000,ip2200,ip3000,ip4000,
    ip1880,ip1980,ip3300,ip3500,ip4200,ip4500,ip5200,ip6700d,IX4000,IX5000,
    Pro9000,Pro9500,etc
    One of visitor of this blog ask me how to reactivate (restore) ink level detection function of Canon ink jet printer. As I told you in the previous post,if you refill ink cartridge or ink runs out then message 'Low ink or Ink has run out' will show. You need to deactivate ink level detection function to continue printing.
    So, how to reactivate the function?. Actually, you don't need do anything. The printer will automatically reactivate the function once brand new genuine ink or cartridge is installed.
    Share:

    December 17, 2009

    Check Print Head Alignment Setting

    Applicable Models:
    Canon i series: i255,355,i450,i550,i850,i950,i6100,i6500,i9100,etc
    Canon Pixma series: ip1000,ip1200,ip1300,ip3000,ip4500,ip3680,
    ip4680,IX4000,IX5000,Pro9000,Pro9500,etc
    To che
    ck print head alignment setting of Canon inkjet printer ,please follow these steps:


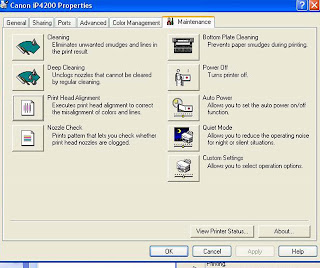
    • Right click in the printer driver name (e.g: Canon Pixma iP4200)
    • Choose Properties
    • Click on Maintenance tab
    • On Align head manually check box:
    - Checked : align the print head manually
    - Unchecked : align the print head automatically
    • Click Send
    Share:

    Print Head Alignment: Correct The Misalignment of Colors and Lines

    Related Models:
    Canon i series: i255,355,i450,i550,i850,i950,i6100,i6500,i9100,etc
    Canon Pixma series: ip1000,ip1200,ip1300,ip3000,ip4500,ip3680,
    ip4680,IX4000,IX5000,Pro9000,Pro9500,etc
    To correct misalignment of colors and line in canon ink jet printer we have to execute print head alignment procedure. There are two ways to execute print head alignment: auto print head alignment and manual print head alignment. In this post, we will use Canon Pixma iP4200 as sample model.
    Before executing print head alignment, please check print head alignment setting in the printer driver properties first.

    AUTO PRINT HEAD ALIGNMENT

    • Choose auto print head alignment setting
    • Click on Print Head Alignment button
    • Wait until the process complete and print head alignment pattern is printed.


    Pict. 1. Print Head Alignment


    Pict 2. Auto Print Head Alignment Pattern


    MANUAL PRINT HEAD ALIGNMENT

    • Choose manual print head alignment setting
    • Set 2 pieces of A4 paper in auto sheet feeder
    • Click Print Head Alignment button
    • Click OK on displayed message "Do not start another operation until current one has finished!"
    • Wait until print head alignment pattern is printed


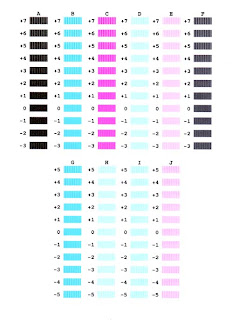
    Pict 3. Manual Print Head Alignment Pattern 1

    • Click Yes on displayed message "Were the pattern printed normally?"
    • Choose the value with the smoothest pattern for each column and set it on displaying windows and click OK
    • Click OK on displayed message "The next step is to print alignment pattern for plain paper setting"
    • C lick OK on displayed message "Do not start another operation until current one has finished!"
    • Wait until print head alignment pattern is printed


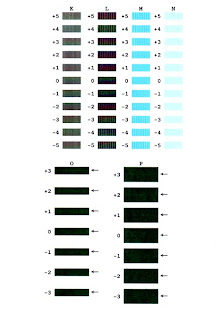
    Pict 4. Manual Print Head Alignment Pattern 2

    • Choose the value with the smoothest pattern for each column and set it on displaying windows and click OK
    • Click OK on displayed message "Print head alignment is now complete"
    Share:

    December 14, 2009

    Colours and Lines Misalignment

    Applicable Models:
    All Canon inkjet printer,most of other inkjet printer brand
    Have you ever experienced this problem with your inkjet printer?. The printing result of document or picture get little bit shadowed, some colors and lines are misalignment.
    Take it easy. It's not a big deal dude!. The problem frequently happens when we remove the print head or cartridge from carriage unit. And then, the print head is not always in proper position after we reinstall it.
    To correct this problem we have to execute Print Head Alignment operation from printer driver properties.
    Share:

    December 04, 2009

    EEPROM Resetter (General Tools) for Canon Pixma iP1200

    Applicable models:
    Canon Pixma iP1200,iP1600,iP2200
    This software is an EEPROM resetter (General Tools) to conduct various service actions for Canon Pixma iP1200,iP1600, and iP2200. This tool can be used for the two other models due its convertibility both in mechanical and electrical system.

    The following service actions can be performed by using this resetter (General Tools):
    • Clear (reset) waste ink counter
    • Clear EEPROM data
    • Change the printer model name
    • etc
    Get this tools!
    Share:

    Error Code: E5

    Related models:
    Canon Pixma MP145,MP150,MP160
    Error code E5 shows when one of (or both) the cartridge installed in the printer cannot be detected by the printer. Most common of this problem is caused by faulty cartridge. But actually there are some other possibilities such as: carriage unit or logic board is faulty. Sometimes dirty cartridge contact area may cause the same problem.
    To fix this problem, the simplest one is to clean the cartridge contact area and reinstall the cartridge. If the problem still persist, try to compare with good cartridge installed in your printer to make sure whether the cartridge is faulty. If the problem is cleared means that the one or both the cartridge is faulty. If the error message E5 keep showing on the printer display, the carriage unit or logic board are the most possible part that is faulty.
    So,you may try the following steps to fix the problem:
    • Clean the cartridge contact and reinstall the cartridge
    • Replace the cartridge
    • Replace carriage unit
    • Replace logic board
    Share: