


Related Models:To correct misalignment of colors and line in canon ink jet printer we have to execute print head alignment procedure. There are two ways to execute print head alignment: auto print head alignment and manual print head alignment. In this post, we will use Canon Pixma iP4200 as sample model.
Canon i series: i255,355,i450,i550,i850,i950,i6100,i6500,i9100,etc
Canon Pixma series: ip1000,ip1200,ip1300,ip3000,ip4500,ip3680,
ip4680,IX4000,IX5000,Pro9000,Pro9500,etc
Before executing print head alignment, please check print head alignment setting in the printer driver properties first.
AUTO PRINT HEAD ALIGNMENT

Pict. 1. Print Head Alignment
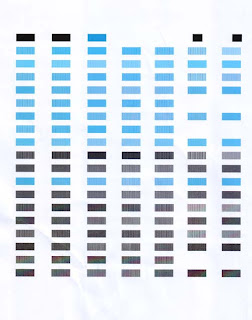
Pict 2. Auto Print Head Alignment Pattern
MANUAL PRINT HEAD ALIGNMENT
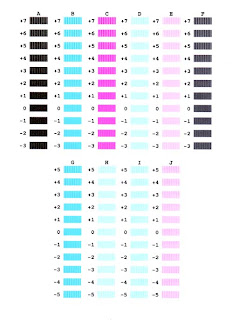
Pict 3. Manual Print Head Alignment Pattern 1
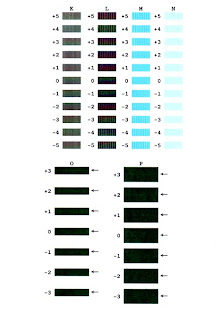
Pict 4. Manual Print Head Alignment Pattern 2
AUTO PRINT HEAD ALIGNMENT

- Choose auto print head alignment setting
- Click on Print Head Alignment button
- Wait until the process complete and print head alignment pattern is printed.
Pict. 1. Print Head Alignment

Pict 2. Auto Print Head Alignment Pattern
MANUAL PRINT HEAD ALIGNMENT
- Choose manual print head alignment setting
- Set 2 pieces of A4 paper in auto sheet feeder
- Click Print Head Alignment button
- Click OK on displayed message "Do not start another operation until current one has finished!"
- Wait until print head alignment pattern is printed

Pict 3. Manual Print Head Alignment Pattern 1
- Click Yes on displayed message "Were the pattern printed normally?"
- Choose the value with the smoothest pattern for each column and set it on displaying windows and click OK
- Click OK on displayed message "The next step is to print alignment pattern for plain paper setting"
- C lick OK on displayed message "Do not start another operation until current one has finished!"
- Wait until print head alignment pattern is printed

Pict 4. Manual Print Head Alignment Pattern 2
- Choose the value with the smoothest pattern for each column and set it on displaying windows and click OK
- Click OK on displayed message "Print head alignment is now complete"


0 comments:
Post a Comment