Online Source of Printer Tips,Tricks,Troubleshooting,and Technical Support.

December 31, 2009

Canon Printing Technology: ChromaLife 100+

ChromaLife 100+ is a new system of Canon printing technology to preserve long-lasting beauty of photos.
In order to maximize the superior printing ability of the "FINE' print head, Canon continues to develop ink and paper specifically for PIXMA printer to enhance their performance.
In 2008,a further advance has been achieved with the introduction of new genuine dye ink and genuine photo paper.
The new system;ChromaLife 100+ provides longer-lasting and more beautiful vivid photo prints.
ChromaLife 100+ provides: 
  • Over 300-years life in an album
  • Approx. 30-years light fastness
  • Approx. 20-years gas fastness
As the comparison, the previous technology ChromaLife 100 provides:
  • Approx. 100-years lif in an album
  • Approx. 30-years light fastness
  • Approx. 10-years gas fastness
Share:

December 30, 2009

Change Paper Source Setting Canon Pixma MP638

Related models:
Canon Pixma MP628,MP638,MP648,etc
As we know that Canon Pixma MP638 has two paper source: Cassette and Rear Tray. Default setting of paper source of Canon Pixma MP638 define as: Casette for plain paper and Rear Tray for photo paper. But,sometimes we need to print on plain paper from specified paper source. Before doing this,we need to select paper source first. We can change paper source setting both from printer driver properties or from the printer menu. For this chance, I tell you how to set plain paper source directly from the printer menu.


Here are the steps:
  • Scroll Easy Scroll Wheel until Setting menu appears,press OK button
  • Select Device Setting,press OK
  • Select Plain Paper Feed Setting,press OK
  • Specify paper source: Rear Tray or Cassette
Share:

Canon Pixma iP1200 Self Test: Checking Nozzle Pattern Without Computer

Applicable models:
Canon Pixma iP series: iP1200,iP1600,iP2200,iP1300,iP1700,iP1880,iP2580,iP1980
How can we check whether the printer work normally or not while we have no computer to connect?.  Well,actually we can perform self test on Canon pixma iP series listed above  without being connected to the computer. Just do following procedure.

PROCEDURE:
  • Power ON the printer and make sure that the cartridge are installed
  • Set the paper in paper tray
  • In stand by condition, press RESUME button 5 times in a row within 2 seconds (The printer will start printing immediately).
The print out pattern should be like this:


Share:

December 26, 2009

The Most Extreme Sex Position of The World

Once in a while I write non printer related post that you can find under miscellaneous category even though my blog focused on printer topic. I just need refreshing like you all do :). Well,please check this one.
Probably,this is the most extreme and dangerous sex position in the world ever. If you are not professional,please don't do this action!
Share:

December 25, 2009

Reset Waste Ink Counter Epson Stylus T10

Applicable Models: 
Epson Stylus T10,T11

PROCEDURE

Preparation:

Steps:

  • Turn on the printer and connect the cable
  • Click Loader.exe to run program
  • On License Agreement window, click Accept button
  • Click Select button
  • Select the printer model
  • Select auto detection on Port menu
  • Click Particular Adjustment Mode
  • Select Maintenance>Waste Ink Pad Counter

The following window appears


  • Click Check button to show the counter value
  • Click Initialization button and wait until the operation is completed
  • Turn of the printer when you order to do so
  • Click OK button
  • Wait until an order to turn on the printer shows
  • Turn on the printer
  • Click OK button
  • Last, click Check button to ensure that the operation is successful
  • Exit adjustment program and operate your printer as usual
Share:

EEPROM Resetter for Epson T10

Related Models:
Epson Stylus T10,T11
This is an adjustment program software (EEPROM resetter) for Epson Stylus T10 and T11 inkjet printer series. The T10 EEPROM resetter is used to reset waste ink pad counter for Epson Stylus T10 and T11 colour printer.
Please read reset procedure before using this software.

Share:

December 24, 2009

Access Maintenance Menu of Canon Pixma MP638

Canon Pixma MP638 is one of the latest canon multifunction printer which has Easy Scroll Wheel button. This button allow us move from one menu to another.

In this chance I will lead you how to access maintenance menu of this printer without PC.

Steps:
  1. Scroll the Easy Scroll Wheel until SETTING menu appears, press OK button
  2. When MAINTENANCE menu appears, press OK button
  3. Select the maintenance operation to perform:
  • Nozzle Check Pattern: Print current pattern of the print head to check nozzle condition.
  • Cleaning: Clean the print head nozzle to prevent it from clogging or to unclog the print head.
  • Deep Cleaning: Perform cleaning operation with the longer duration.
  • Auto Head Alignment: Align the print head automatically.
  • Manual Head Alignment: Align the print head manually.
  • Head Alignment Print: Print current value (pattern) of the print head alignment.
  • Roller Cleaning: Execute paper feed roller cleaning operation.
  • Bottom Plate Cleaning: Execute bottom plate cleaning operation.
Source:
Parts Catalog
Share:

December 21, 2009

Reset Waste Ink Counter Canon i320

Applicable models:
Canon i320,Pixus xnu i320
PROCEDURE
Step I: Enter Service Mode
  • Hold down POWER button
  • Plug in power cable
  • Press RESUME button twice in a row
Step II: Operating EEPROM Resetter (General Tool)


  •  Run General Tool.exe
  • Connect USB cable
  • Select USB PORT
  • Under SET DESTINATION menu,click on: 1 for Pixus xnu i320,2 for i320
  • Exit General Tool and turn off the printer
The EEPROM data is cleared by setting the destination of the printer and get your printer work!.

Source: Service Manual
Share:

Reset Waste Ink Counter Canon i255

Applicable Models:
Canon i series: i255,i250,i350,i355
This service action is needed to clear waste ink absorber full error of Canon i250,i255,i350,i355.


PROCEDURE

Step I: Enter Service Mode:

  • Hold down POWER button
  • Plug in power cable
  • Press RESUME button twice in a row
Step II: Operating EEPROM Resetter (General Tool)


  • Connect USB cable
  • Run General Tool.exe
  • Select USB PORT
  • Check EEPROM CLEAR check box
  • Set A4 paper on sheet feeder
  • Click TEST PATTERN 1 or TEST PATTERN2 
(Wait until the printer complete printing test pattern,EEPROM data is cleared while printing the test pattern)
  • Exit general tool and turn off the printer

    Now turn on the printer and you will get your printer work normally.

    Source: Service Manual
    Share:

    Enter Service Mode Canon Pixma MX308

    Applicable Models:
    Canon Pixma MX series: MX318,MX850,MX7600,etc
    In order to enter service mode of Canon Pixma MX308, please read carefully the following procedure.

    PROCEDURE

    • Plug in power cable
    • In OFF condition, press and hold STOP/RESET button
    • Press and hold POWER button
    • Release STOP/RESET button
    • Press STOP/RESET button twice in a row
    • Release POWER button
    In this state,the printer has been already in Service Mode and you can access some service actions from here.

    Source: Service Manual
    Share:

    December 18, 2009

    Reactivate Ink Level Detection Function

    Applicable Models:
    BJC series: bjc3000,8200,etc
    S series: s400,s600,s800,s6300,s9000,etc
    i Series: i255,i320,i350,i355,i450,i550,i560,i850,i950,i6100,
    i6500,i9100,etc
    Pixma series: ip1000,ip1200,ip1300,ip1500,ip1600,ip1700,ip2000,ip2200,ip3000,ip4000,
    ip1880,ip1980,ip3300,ip3500,ip4200,ip4500,ip5200,ip6700d,IX4000,IX5000,
    Pro9000,Pro9500,etc
    One of visitor of this blog ask me how to reactivate (restore) ink level detection function of Canon ink jet printer. As I told you in the previous post,if you refill ink cartridge or ink runs out then message 'Low ink or Ink has run out' will show. You need to deactivate ink level detection function to continue printing.
    So, how to reactivate the function?. Actually, you don't need do anything. The printer will automatically reactivate the function once brand new genuine ink or cartridge is installed.
    Share:

    December 17, 2009

    Check Print Head Alignment Setting

    Applicable Models:
    Canon i series: i255,355,i450,i550,i850,i950,i6100,i6500,i9100,etc
    Canon Pixma series: ip1000,ip1200,ip1300,ip3000,ip4500,ip3680,
    ip4680,IX4000,IX5000,Pro9000,Pro9500,etc
    To che
    ck print head alignment setting of Canon inkjet printer ,please follow these steps:


    • Right click in the printer driver name (e.g: Canon Pixma iP4200)
    • Choose Properties
    • Click on Maintenance tab
    • On Align head manually check box:
    - Checked : align the print head manually
    - Unchecked : align the print head automatically
    • Click Send
    Share:

    Print Head Alignment: Correct The Misalignment of Colors and Lines

    Related Models:
    Canon i series: i255,355,i450,i550,i850,i950,i6100,i6500,i9100,etc
    Canon Pixma series: ip1000,ip1200,ip1300,ip3000,ip4500,ip3680,
    ip4680,IX4000,IX5000,Pro9000,Pro9500,etc
    To correct misalignment of colors and line in canon ink jet printer we have to execute print head alignment procedure. There are two ways to execute print head alignment: auto print head alignment and manual print head alignment. In this post, we will use Canon Pixma iP4200 as sample model.
    Before executing print head alignment, please check print head alignment setting in the printer driver properties first.

    AUTO PRINT HEAD ALIGNMENT

    • Choose auto print head alignment setting
    • Click on Print Head Alignment button
    • Wait until the process complete and print head alignment pattern is printed.


    Pict. 1. Print Head Alignment


    Pict 2. Auto Print Head Alignment Pattern


    MANUAL PRINT HEAD ALIGNMENT

    • Choose manual print head alignment setting
    • Set 2 pieces of A4 paper in auto sheet feeder
    • Click Print Head Alignment button
    • Click OK on displayed message "Do not start another operation until current one has finished!"
    • Wait until print head alignment pattern is printed


    Pict 3. Manual Print Head Alignment Pattern 1

    • Click Yes on displayed message "Were the pattern printed normally?"
    • Choose the value with the smoothest pattern for each column and set it on displaying windows and click OK
    • Click OK on displayed message "The next step is to print alignment pattern for plain paper setting"
    • C lick OK on displayed message "Do not start another operation until current one has finished!"
    • Wait until print head alignment pattern is printed


    Pict 4. Manual Print Head Alignment Pattern 2

    • Choose the value with the smoothest pattern for each column and set it on displaying windows and click OK
    • Click OK on displayed message "Print head alignment is now complete"
    Share:

    December 14, 2009

    Colours and Lines Misalignment

    Applicable Models:
    All Canon inkjet printer,most of other inkjet printer brand
    Have you ever experienced this problem with your inkjet printer?. The printing result of document or picture get little bit shadowed, some colors and lines are misalignment.
    Take it easy. It's not a big deal dude!. The problem frequently happens when we remove the print head or cartridge from carriage unit. And then, the print head is not always in proper position after we reinstall it.
    To correct this problem we have to execute Print Head Alignment operation from printer driver properties.
    Share:

    December 04, 2009

    EEPROM Resetter (General Tools) for Canon Pixma iP1200

    Applicable models:
    Canon Pixma iP1200,iP1600,iP2200
    This software is an EEPROM resetter (General Tools) to conduct various service actions for Canon Pixma iP1200,iP1600, and iP2200. This tool can be used for the two other models due its convertibility both in mechanical and electrical system.

    The following service actions can be performed by using this resetter (General Tools):
    • Clear (reset) waste ink counter
    • Clear EEPROM data
    • Change the printer model name
    • etc
    Get this tools!
    Share:

    Error Code: E5

    Related models:
    Canon Pixma MP145,MP150,MP160
    Error code E5 shows when one of (or both) the cartridge installed in the printer cannot be detected by the printer. Most common of this problem is caused by faulty cartridge. But actually there are some other possibilities such as: carriage unit or logic board is faulty. Sometimes dirty cartridge contact area may cause the same problem.
    To fix this problem, the simplest one is to clean the cartridge contact area and reinstall the cartridge. If the problem still persist, try to compare with good cartridge installed in your printer to make sure whether the cartridge is faulty. If the problem is cleared means that the one or both the cartridge is faulty. If the error message E5 keep showing on the printer display, the carriage unit or logic board are the most possible part that is faulty.
    So,you may try the following steps to fix the problem:
    • Clean the cartridge contact and reinstall the cartridge
    • Replace the cartridge
    • Replace carriage unit
    • Replace logic board
    Share:

    November 28, 2009

    EEPROM Resetter (General Tools) for Canon Pixma iP1300

    Applicable models:
    Canon Pixma iP1300,iP1700
    This is a EEPROM resetter (General Tools) for Canon Inkjet Printer Pixma iP1300 series. Due to its convertibility in mechanical and electrical system, It's can be used to perform various service actions both for Canon Pixma iP1300 and Canon Pixma iP1700 model.
    Here some of service actions that we can do with this resetter:
    • Clear (reset) waste ink counter
    • Clear EEPROM data
    • Change the printer model name
    • etc
    Get this tools!

    Share:

    November 24, 2009

    Setting Ink Cartridge Canon Pixma ip1980: Keep Printing When Only One Cartridge Has Ink Inside

    Applicable Models: 
    Canon Pixma iP series: iP1300,iP1700,iP1200,iP1600,iP2200,and iP1880
      One day a visitor left comment in comment box asking:
    Is it true that ip1980 can't print while only one catridge operation. So, how i can keep printing when only 1 catridge that contain ink?
    Arcava
    Thanks to Arcava who has left her comment in my previous post Product Review: Canon Pixma ip1980. The question gives me a fresh idea to write this post for you all.
    Have you ever experienced the problem like Arcava got?. And how can you solve the problem?.
     Well, I will start by answering the question listed above. That's right that Canon Pixma ip1980 can't print when only one cartridge is installed. We must install all the cartridges both black and color.
    So, how can we keep printing if you have just one cartridge with the ink inside while other is empty?. Alright, to get your printer keep printing under this condition you must specify ink cartridge for printing in the printer driver properties. You can find this function under Maintenance tab.

     The following steps will lead you how to set (specify) ink cartridge of Canon Pixma iP1980 for printing:


    1. Set all the printer cartridge both black and color cartridge (including the empty one)
    2. Right click on printer driver properties
    3. Click Maintenance tab
    4. Click on Ink Cartridge Setting mark
    5. In pop up menu, select the cartridge which has ink inside (black only or color only).
    Now your printer will keep printing by using only one cartridge that you specify in Ink Cartridge Setting menu.

    Note: It's not recommended to install empty cartridge in your printer for long time due to thermal issue. I promise to discuss it later, okay?

    Source: Service Manual
    Share:

    November 22, 2009

    Reset Waste Ink Counter Canon Pixma MP110 (Complete Steps)

    Applicable Models:
    Canon Pixma MP110,MP130
    In the previous post I have written the procedure how to reset waste ink counter Canon Pixma MP110 to fix absorber full error. I split the procedure in to part: enter service mode and reset procedure itself. If you don't like the split procedure here I rewrite the complete one.

    PROCEDURE:
    I. Enter Service Mode
      • Turn ON the printer
      • Press these button in the following order correctly: MENU,SCAN,COPY,SCAN
      II. Reset Waste Ink Counter
      • Press right arrow untill 'COUNTER ACCESS' appears
      • Press OK
      • Press right arrow untill 'ABS-M DOT COUNT' appears
      • Press COPY button
      • Set 'ABS-M DOT COUNT' to 0 by pressing left arrow
      • Press OK
      • Press STOP/RESET to exit service mode
        Your printer should work normally now.
        Download the procedure here

        Share:

        November 12, 2009

        Error Types of Canon Printer

        Generally, there are two types of error in Canon inkjet printer:
        • Operator Call Error
        • Service Call Error
        Operator Call Error is error in Canon inkjet printer at user level that might be overcame by the user with guidance of service engineer of Canon printer online from Canon Service Center. This error is represented by LED indicator blinking in orange.
        Service Call Error is error in Canon inkjet printer which cannot be overcame by the user. The printer needs some service actions in Canon Service Center and it may need some printer parts replacement too. This error is represented by LED indicator blinking in orange/green alternately.
        In order to know how to identify an error of Canon inkjet printers accurately, please check here for more details!
        Share:

        November 11, 2009

        Enter Service Mode: Method II

        Related Models:
        Canon i series:  i250,I255,I320I,350,I355
        Canon Pixma series: ip1000,ip1200,ip1500,ip1600,ip2200,ip1300,ip1700,ip1880,ip1980
        This post will guide you how to enter service mode of Canon inkjet printers of models listed above. Please read carefully the following procedure.


        PROCEDURE:


        • While the printer is in OFF condition, press and hold down POWER button
        • Plug in power cable
        • Press RESUME/CANCEL button twice in a row

        Now, the printer is already in service mode and the power lamp is standing by. We can access various service actions from this printer mode such as: reset waste ink counter, clear EEPROM data,check page counter,etc.

        Share:

        Reset Waste Ink Counter Canon Pixma MP160

        Applicable Models:
        Canon Pixma MP180,MP170,MP150,MP145
        As we know that we need to reset waste ink counter of the Canon inkjet printers to fix waste ink absorber full error. Please follow below procedure to reset waste ink counter Canon Pixma MP160.


        PROCEDURE

        I. Enter Service Mode:
        • Plug in power cable
        • Hold down STOP/RESET button
        • Hold down POWER button
        • Release STOP/RESET
        • Press STOP/RESET twice in a row

        II.Execute Waste Ink Counter Reset Operation:
        • Press STOP/RESET button 4 times (Indicator lamp will blink alternately Orange/Green each time the button is pressed)
        • Turn off the printer by pressing POWER button (wait until the printer is completely OFF)
        When you turn on the printer,waste ink absorber full error is cleared and the printer work normally.
        Share:

        November 07, 2009

        Links List

        After so long time I let this blog alone now it's time to get in touch with other blog via link list. Any blog please welcome. Please set my link,left your request in comment on this post and I set your link back.

        Here my blog you should set with:
        Anchor text: Inkjet Printer Zone
        URL: http://ij-forum.blogspot.com
        Category: Computer (if any)

        Please state this information in your comment:
        Anchor text: ....
        URL: ....
        Category: ...

        Many thanks,


        MY BLOG LINKS LIST

        Computer
        Printer Manual & Parts Catalog


        Share:

        November 03, 2009

        Canon Pixma MX308: Service Call Error 6000

        Error Code: 6000
        Related Models:
        Canon Pixma MX308,MX318,MX700,MX850,MX7600
        Have you ever experienced that your Canon Pixma MX308 displays 'Service Call Error 6000' on LCD?. At the same time the printer cannot feed the paper at all. So,what happen with the printer?. Now, we'll discuss about this problem.

        Service Call Error 6000 is error code generated by the printer when the Line Feed error occurs. The error rises since Line Feed (LF) encoder signal has problem causes the printer fail in line feeding process.

        The problem may happen under the following conditions:

        • Logic board fail in reading the LF encoder signal
        • LF sensor is faulty
        • Drive assy broken
        Here are the remedial actions:
        • Replace logic board
        • Replace LF sensor
        • Replace drive assy
        Oh yes, I have unique experience with this problem. One day I found the problem and did all above actions but no result. What's wrong???. After observing the printer behaviour, I found that paper feed motor belt was set too tight gave heavy load to the motor. The problem resolved after the belt of paper feed motor was loosen. Bingo..!
        Share:

        October 31, 2009

        Canon Pixma MX Series: Fax Memory Reception

        Related Models:
        Canon Pixma MX308,MX318,MX700,MX850,MX7600,etc.
        "My machine cannot print a fax. The document received in memory instead. at the same time I see the In Use/Memory lamp is lit"
        A friend submit the problem on www.fixya.com and request for the solution. Well,now we'll discuss about this topic. When the machine shows message 'Received in Memory' on the LCD and lamp 'In Use/Memory' is lit then it will not be able to print incoming fax document.
        This case may happen under one of the following conditions:
        • Ink has run out: Replace the FINE cartridge or ink tank
        • Paper has run out: Load the paper anda press the OK button
        • A different size of paper that specified by page size is loaded: Load the same size of paper as that specified by Page size then press the OK button
        • Page size is set to other than A4,8.5"X11" (LTR) 8.5"X14" (Legal): Set Page size to A4, 8.5"X11" (LTR) 8.5"X14" (Legal)
        • Media type is set to other than Plain paper: Set Media type to Plain paper
        • You pressed the STOP button to cancel printing of a fax: Press the FAX button
        • The machine is not set in FAX mode (but in COPY or SCAN mode): Press the FAX button
        Once the problems are resolved as described, the fax document received in memory is printed automatically.
        Share:

        October 28, 2009

        Error Message: Check Ink U041

        Related Models:
        Canon Pixma MX300,MX318,MX700,MX850,etc
        The error message 'Check ink U041' appears in LCD display when the ink indicated by the error message start running low or running out. At the same time, error message 'The following ink may have run out. Replace ink tank' shows in monitor. Since few amount of ink stays remain in cartridge sponge, we may continue printing few pages by deactivate ink level detection function.
        Share:

        October 27, 2009

        Printer Part: Logic Board

        A main board (logic board) in a inkjet printer plays it main role as a control center of the inkjet printer operation. It arrange all of mechanical systems (such as paper feeding system, purging system,etc) and electrical systems (such as sensor,heater,carriage unit,motor driver,data transfer to/from computer,etc).
        The logic board provides important data (EEPROM data) that contains data such as: page counter, time setting, waste ink absorber counter, error code history, etc.
        The data that stored by the logic board is very useful for troubleshooting the printer problems.
        Share:

        October 25, 2009

        Printer Part: Carriage Unit

        Carriage unit (carriage part) is one of main inkjet printer part. Act as house of cartridge (print head) , it plays important role in an inkjet printer . Most of major brand of inkjet printer manufacturer such as Hewlett-Packard (hp), Epson, Lexmark, Canon , etc; adopt this part in all of their product. The carriage unit is driven by a carriage motor to move the cartridge right and left to exact position of ink drop zone on media surface. Smooth carriage unit movement ensure good printing quality due precise ink dropping position.
        Any disturbance on carriage unit movement may cause some bad print out,even in some cases it may cause error code 5100 shows in monitor or LCD of the printer.
        Share:

        October 18, 2009

        Error Message: The Following Ink Tank cannot be Recognized (U043)

        Related model:
        Canon Pixma MX700,MX850,MX7600

        Have you ever seen this message 'The following ink tank cannot be recognized (U043)' appears in your Canon Pixma MX700 LCD?. What is it means?. This error message indicates that ink related problem happens. But, it may not exactly the problem is ink tank. You need to be wise to not judge that ink tank must be faulty. Please check this related post to know more.

        Read also:
        Error Message: Ink Tank not Installed

        Share:

        Error Message: Ink Tank not Installed

        Related Models:
        Canon Pixma MX700,MX850,MX7600,etc

        Description:

        Ink Tank Cannot be Recognized

        Error Code:
        U043 (displasy in LCD)
        1660 (displasy in PC monitor)

        This error occurs when ink tank indicated by the error message cannot be detected by the printer (printer assume that ink tank is absent). In other word,no communication between ink tank and printer board.
        If you get this problem do not rush to conclusion that ink tank is faulty. Ink tank cannot be recognized due to several reasons: ink tank not installed properly,ink tank chip (built in) is faulty, carriage unit is faulty, and last logic board is faulty (rarely).
        So,here is some remedial action you should do:
        • Remove and reinstall ink tank properly,confirm that the LED's of all ink tanks light reds.
        • Replace ink tank
        • Replace carriage unit
        • Replace logic board
        Related posts:
        Share:

        October 10, 2009

        Carriage Error

        Summary:
        This is one of most common problem of Canon inkjet printer. The error happens when carriage unit (carriage part) is faulty so that carriage unit cannot read film encoder properly. As a result, carriage unit movement no more under printer board's control.
        But note that in some cases, dirty film timing slit strip (Horizontal film encoder;available in Canon i series,pixma series) may cause the same symptom.

        Remedial action:
        • Replace carriage unit
        • Wipe film timing slit strip with moistened clothes
        • Replace film timing slit strip

        Related post:
        Blinking in Orange/Green: 2 times
        Share:

        October 02, 2009

        PIXMA: Behind Logo Type Design


        PI = Pixel; represent the highest image quality.
        MA
        = Maximum and Power; represent the greatest speed.

        In this chance we talk about history of Canon inkjet printer PIXMA series name and logo type design.

        The 'X' in the PIXMA logo type design expresses the Canon approach. The 'X' symbolize the close link beetwen input and ouput.As the world's only manufaccturer with technological capabilities from the input through output stages,Canon will continue to deliver prouducts that can print extremely precise input with the highest quality and greatest speed. This 'X' represent this goal that only Canon can achieve.


        The three types of DNA backing up the PIXMA commitment.

        EOS Digital DNA: Photographic Technology

        This is the EOS Digital DNA from Canon's starting point: cameras.

        imageRUNNER DNA: Copier Technology
        PIXMA image processing is conducted through the incorporation of advanced digital color-copier technology.

        Inkjet printing technology DNA: Print Head Technology
        This is the inkjet printing technology DNA. Canon's print head technology,which stands at the apex of the world's inkjet printers,serves as the foundation for PIXMA .
        Share:

        September 23, 2009

        Reset Waste Ink Absorber Full Error: Canon Pixma MP145,MP150,MP160

        Canon Pixma MP145(140 series),MP150,and MP160 have similar parts and model. No wonder if the way how to reset waste ink abosorber error of these printer is just the same.
        Check this following link to perform the procedure

        Related posts:
        Reset Waste Ink Absorber Part 1
        Share:

        Canon Technology: Two Way Paper Feeding

        Starting from previous of printer model e.g Canon pixma ip3000,Canon introduce two sources of paper feed for their new printer named two way paper feeding that aimed to reduce the amount of time required for changing paper types. These two sources of paper are :
        1. Rear Tray/Auto Sheet Feeder (ASF)
        2. Paper Tray / Cassette

        Auto Sheet Feeder is paper source located in back of the printer. The ASF usually used for:
        • Photo paper
        • Thick paper
        • Less sheet of paper
        Paper Tray/Cassette is paper source located in front of the printer,usually used for:
        • Plain paper
        • Thin paper
        • More sheet of paper
        Related posts:
        Blinking in Orange 3 times
        Paper Feed Error
        Share:

        September 22, 2009

        Review: Canon Pixma MX868

        PIXMA MX868


        Feature

        Print, Scan, Copy, Fax, Networkable, Wireless, Card Direct

        Print
        ISO Standard speed (ESAT): approx. 8.4ipm mono / approx. 5.6ipm colour
        1pl (min) ink droplets and 9600 x 2400 dpi (max) resolution
        Five-colour individual ink tank system
        4 x 6” (4R) borderless photo in approx. 41 sec
        Capable of printing borderless photos up to A4 size
        ChromaLife 100+ technology – photos can last up to 300 years
        Hybrid system - pigment black ink ensures sharp black text and lines even when printed over an image

        Scan
        2400 x 4800 dpi CIS
        Auto Scan Mode allows automation of your scanning and saving procedures to three short steps
        Auto duplex scanning with integrated ADF
        Scan directly to flash drive and memory card and save as pdf or jpg

        Copy
        Copy speed (ESAT): approx. 6.8ipm mono / approx. 3.0ipm colour
        Reproduces accurate second generation photos & documents with Dual Colour Gamut Processing Technology
        Auto duplex copying with integrated ADF
        Binding Margin Copy - binds documents without covering text or images on left side of page
        Punch Hole Removal Copy - eliminates unsightly punch holes from copies
        Print Date/Page Number Copy - prints date and/or page number on each copy
        Gutter Shadow Erase eliminates “gutter” shadows occur in copies made from books and magazines
        Frame Erase removes the black border that might appear on copies

        Fax
        Support Super G3 standard for high-speed electronics transmission
        Security features include fax number re-entry; check RX fax info; caller rejection; fax reception reject
        ADF faxing up to 35 pages of A4 size
        Store up to 250 faxed pages


        Convenient
        Self-opening paper output tray
        2-way paper feeding
        2.5” TFT colour display for easy viewing & selection
        Auto duplex printing/ copying - printing on both sides to save paper
        Quick Start allows you to begin operations just four seconds after powering on
        Auto Photo Fix for quick and automated optimization of images before printing
        MP Navigator EX software with password-protected PDF creation feature

        Easy Printing Options with Direct Print
        Template print – print ruled lines for notebook, checklist, graph paper and manuscript sheets
        Photo Index Sheet - up to 30 photos per sheet, convenient way to review images before reprinting

        Connectivity
        Memory card slots
        PictBridge
        USB 2.0 Hi-Speed
        Ethernet
        Built-in WiFi with WPS and WCN setup
        Bluetooth (optional with BU-30 adaptor)

        Source: Canon Inc
        Share:

        August 07, 2009

        Canon Printer Service Mode

        Service mode is printer mode which used to access various service actions of Canon printer such as EEPROM data printing, clear waste ink absorber counter, etc. Generally, there are 2 method in order to access service mode:
        Method I : Using button pressing combination
        Method II: Using button pressing combination and service software (General Tool)

        Related Post:
        Enter Service Mode
        Share:

        August 05, 2009

        Paper Feed Error

        This error occurs when the paper sensor detects no paper in paper tray or cassette. One of this condition may happen in this case:
        • Paper is out or not set properly
        • Paper sensor is faulty
        • Unidentified material blocking the sensor from paper
        So,please check first whether paper is present in paper tray or not. If you are sure paper is present, set the paper properly then press Resume/Cancel button to continue printing.
        If the problem still persist, remove main cover and clear the paper path from the material.
        Share:

        July 21, 2009

        BJC8200 Error Code List

        Related models:
        Canon BJC8200,S800
        Here are error code list for Canon BJC8200 and S800. Please check!


        Error Code List

        Paper Feed Error
        Indicator: Light in orange
        Beep: 2 times

        Paper Jam Error
        Indicator: light in orange
        Beep: 3 times

        Ink Out Error
        Indicator; light in orange
        Beep: 4 times

        BJ Cartridge not installed
        Indicator: light in orange
        Beep: 5 times

        BJ Cartridge mis-installed
        Indicator: light in orange
        Beep: 6 times

        BJ Cartrigde error
        Indicator: light in orange
        Beep: 7 times

        Waste Ink Full Warning
        Indicator: light in orange
        Beep: 8 times

        Carriage Error
        Blink in orange: 2 times
        Beep: 10 times
        Error code: 5100

        Purge Error
        Blink in orange: 4 times
        Error code: 5c00

        ASF Sensor Error
        Blink in orange: 5 times
        Error code: 5700

        Temperature Sensor Error
        Blink in orange: 6 times
        Error code: 5400

        Waste Ink Full Error
        Blink in orange: 7 times
        Error code: 5B00

        Head Temperature Error
        Blink in orange: 8 times
        Error code: 5200

        EEPROM Error
        Blink in orange: 9 times
        Error code: 6800

        ROM error
        Blink in orange: 10 times
        Error code: 6100

        RAM error
        Blink in orange: 11 times
        Error code: 6300

        Other Hardware Error
        Blink in orange: 12 times
        Error code: 6500

        Related posts: -
        Share:

        July 05, 2009

        BJC 6500,S4500 Errror Code List

        Error code: 6800
        Description: EEPROM ERROR
        Symptom: blink in orange 3 times,beep 10 times

        Error code: 5100
        Description: Home position error
        Symptom: blinks in orange 4 times,beep 10 times

        Error code: 5400
        Description: Printer temperature sensor error
        Symptomp: blink in orange 5 times,beep 10 times

        Error code: 5B00
        Description: Waste ink full error
        Symptom: blink in orange 6 times,beep 10 times

        Error code: 5200
        Description: Head temperature error
        Symptom: blink in orange 7 times,beep 10 times

        Error code: 5600
        Description: Cartridge displaced error
        Symptom: blink in orange 9 times,beep 10 times

        Error code: 5700
        Description: ASF sensor error
        Symptom: blink in orange 10 times, beep 10 times
        Share:

        June 16, 2009

        Checking Printhead Nozzles Condition

        Sometimes we need to know condition of the printhead of our printer. How to check it?. In order to know whether printhead nozzles are clogged of not perform following steps:

        * Set paper in sheet feeder
        * Right click in the printer driver name
        * Select Properties menu
        * Click Maintenance tab
        * Click on Nozzle Check button

        Check printout of nozzles check pattern visually.

        Share:

        May 03, 2009

        Unclogging Clogged Printhead Nozzles

        Related model:
        Canon i series,Pixma iP seies,IX series,MP/MX series

        Summary
        Usage of compatible ink and leave the printer idle too long may cause printhead clogging. What should you do if you get this problem. Relax,you may recover the printhead by unclogging it. Follow these steps to unclog the printhead:
        • Right click in the printer driver name
        • Select Properties menu
        • Click Maintenance tab
        • Click on Cleaning sign for regular cleaning. Perform this up to 3 times.
        If this does not work, perform Deep Cleaning

        Related posts:
        Checking Printhead Nozzles Condition
        Share:

        April 12, 2009

        General Tools Pixma iP1200: Point to Point

        Related Models:
        Pixma iP1200,1600,2200,1300,1700

        Summary:
        As I told you in previous post, General Tools Pixma iP1200 is applicable for iP1600 & 2200 since they are convertible. Event, this tools work in ip1300 & 1700 too. In this chance,I will explain more about General Tools ip1200; point to point.


        Note: click on image to view large image


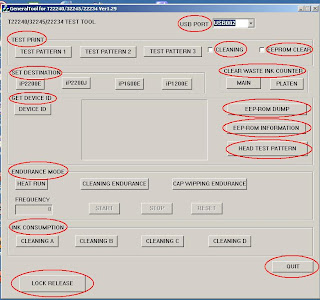
        Here are the explanation about this tools:

        USB PORT

        Click to select active USB port

        TEST PRINT

        To print test pattern or/and trigger CLEANING or EPPROM CLEAR execution. There are 3 test print pattern here.

        CLEANING

        Check this option to perform printhead cleaning operation before printing test pattern.

        EEPROM CLEAR

        Check this option to clear EEPROM data while printing test pattern. Data such as page counter,setting time, etc (except waste ink counter) will be cleared in this operation.

        SET DESTINATION

        There are 4 destination setting: ip2200E (other than Japan),ip2200J (Japan model),1600E, and 1200E. But, remember to click LOCK RELEASE button first to change these options.

        CLEAR WASTE INK COUNTER

        This button use to after ink absorber replacement to fix waste ink absorber full error. Click MAIN to reset main waste ink counter and PLATEN to reset borderless printing waste ink counter.

        GET DEVICE ID

        Use this option to verify model name

        EEPROM DUMP

        Click to show EEPROM data in hexadecimal

        EEPROM INFORMATION

        Contains the data stored in EEPROM,such as page counter,setting time,waste ink counter,etc. Click on button to show it.

        HEAD TEST PATTERN

        Perform nozzle check test pattern

        ENDURANCE MODE

        Use this option to perform heating,cleaning,and cap wipping operation. Set in FREQUENCY how many times the operation will be performed

        INK CONSUMPTION

        This cleaning operation will consume ink for each colour; Black,Cyan,Magenta, and Yellow

        LOCK RELEASE

        Release this lock before setting model name to activate model name button.

        QUIT

        Exit General Tools user interface

        Share:

        March 17, 2009

        Reset Waste Ink Counter:MP110,130

        Below the procedure resetting waste ink counter of MP110 & 130:

      • Turn ON the printer
      • Enter service mode
      • Press right arrow untill 'COUNTER ACCESS' appears
      • Press OK
      • Press right arrow untill 'ABS-M DOT COUNT' appears
      • Press COPY button
      • Set 'ABS-M DOT COUNT' to 0 by pressing left arrow
      • Press OK
      • Press STOP/RESET to exit service mode
      • Related post:

        Enter Service Mode MP110,130
        Share:

        Enter Service Mode: MP110,130

        In order to enter Service Mode on MP110 & 130 series,perform following procedure:
        • Turn ON the printer
        • Press these button in right order:MENU>SCAN>COPY>SCAN
        In this step,the printer is already in service mode.

        Related posts:-
        Share:

        February 01, 2009

        Canon Technology: Dual Color Gamut Processing Technology


        Pict. How Dual Color Gamut Processing Technology works

        All-in-one inkjet printers make copying easy. Especially when making copies of color photographs, in order to achieve faithful color reproduction, it is essential to reconcile the differences between the color range of the scanned original and the range of expression possible with the inkjet printer. Canon developed its Dual Color Gamut Processing Technology to faithfully reproduce the colors of original documents in copies.

        This technology takes advantage of Canon's extensive expertise in copying machines, taking into account factors such as the type of paper being used and human vision characteristics in order to achieve the same color balance and gradation as originals, even photos. By independently controlling the brightness and hue of the scanned data based on printer characteristics and paper type, Dual Color Gamut Processing Technology enables the creation of copies with rich gradation and minimal color variance.

        Source: Canon Inc.
        Share:

        Product Review: Canon Pixma MP245


        Early in this year of 2009, Canon Inc released some Multifunction inkjet printers (MFP). One of them is Canon Pixma MP245. This printer is prepared to replace MP145.
        Some improvements applied in this printer are:

        Printing
        - Resolutions : 4800 x 1200 (max) with 2 picolitre* smallest ink droplet.
        - Speed: up to 19 ppm (monochrome) dan 15 ppm (color).
        - 4" x 6” (4R) borderless photo in approx. 45 sec
        - Borderless printing support A4 size
        - Latest FINE cartridge technology : chromalife100+ 300 years.

        Ink
        Using new cartridge type PG 810 dan CL 811

        Scanning
        - Scanning Technology using CIS with resolution 1200 x 2400 dpi (max)
        - Scanning Bit Depth at 48 bit (input)/ 24 bit (output)
        - Auto Scan Mode

        Copy
        - Copy speed : 19cpm mono / 15cpm colour
        - Can reproduce ultimate copy quality even from the second generation copy with Dual Colour Gamut Processing Technology

        Convenient
        - Self-opening paper output tray when printing / copying, so we don't worry to forget opening output tray
        - Quick Start
        - Auto Photo Fix via Easy-PhotoPrint EX and MP Navigator EX
        - 4-in-1 and 2-in-1 printing and copying reduce paper wastage. Special mode where we may copy 4 or 2 original on 1 page.

        Connectivity
        - PictBridge; not available in MP145.
        - USB 2.0 Hi-Speed

        Environmental Friendly

        - Conforms to EU RoHS
        - Supports International Energy Star Program

        * 1 picoliter = 1 x 10-12 liter

        Share:

        January 18, 2009

        Error Message: Check Ink U051,U059

        Description:
        Cartridge Error, Cartridge not installed, Non supported cartridge is installed

        Error Code appears in Monitor:
        1401,1485

        Related Models:
        Canon Pixma MX308,MX318, etc

        Summary:
        Error Message 'Check Ink U051' or 'Check Ink U059' appears when the ink cartridge is not installed properly, not actually installed, or non supported cartridge is installed.
        As a result the printer cannot detect the cartridge presence.

        Remedial action:
        • Reinstall the cartridge properly
        • Ensure that you installed supported cartridge only
        • Replace the cartridge
        Related posts:
        Blinking in orange 5 times
        Share:

        January 04, 2009

        Download Corner

        Entering year of 2009 we make useful change to this blog. Realized that some posts in this blog need supporting software like General Tools (EEPROM resetter) we added important links to General Tools download. You also download these tools from below links.

        General Tools (EEPROM Resetter)

        Canon

      • i320 Win98
      • i320 WinXP
      • i255_i355 Win98
      • i255_i355 WinXP
      • Pixma ip1000 Win98_XP
      • Pixma ip1500 Win98_XP
      • EEPROM Restore for Pixma ip6210d,6220d,MP150,170,450
      • Tools & EEPROM Restore for Pixma ip1200,1600,2200
      • Pixma ip1300,1700 WinXP
      • Pixma ip1880 (ip1980 compatible) WinXP
      • MP universal tools WinXP
      • iP universal tools WinXP
      • Share:

        January 02, 2009

        Error E27: a Video Support

        Description:
        Waste Ink Absorber Full Error

        Related Models:
        Canon Pixma MP140(5),150,160


        Related posts:
        Error Code: E27
        Share: